
How To Put External Flash On A Camera?
An external flash for a camera is an essential accessory for photographers at all levels, enabling them to significantly enhance the quality of their images by providing better lighting control. Whether you’re looking to reduce harsh shadows, illuminate your subject in low-light situations, or create artistic lighting effects, the proper use of an external flash can take your photography to the next level. In this article, we will walk you through everything you need to know about attaching and using an external flash with your camera, along with practical advice for achieving optimal results.
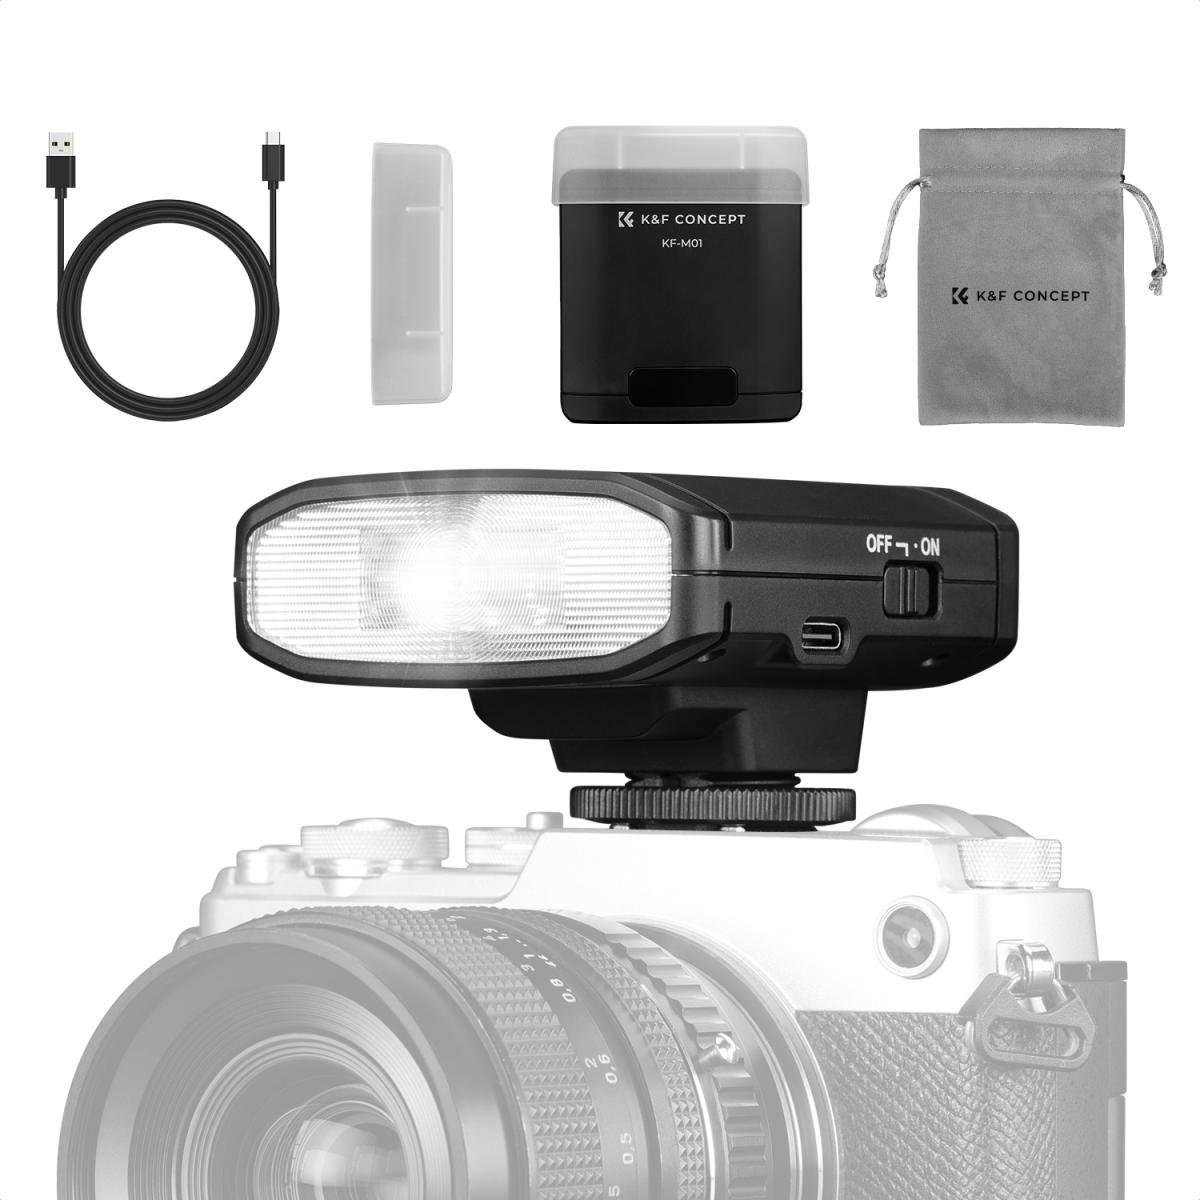
Understanding External Camera Flashes
Before diving into the setup, it's helpful to understand what an external flash is and why it’s useful. Unlike the built-in flash found in most cameras, an external flash offers more power, range, and flexibility. It can also be adjusted in terms of angle, intensity, and direction, giving a photographer more creative control over their lighting needs.
External flashes generally connect to cameras via a hot shoe mount (located on the top of the camera body) or wirelessly, depending on the model. Some advanced setups include off-camera flashes, which can be triggered remotely for even greater versatility in lighting positioning.
Step-by-Step Guide to Attaching an External Flash
1. Check Compatibility
Before purchasing and attempting to attach an external flash, ensure it’s compatible with your camera's brand and model. Some flashes are designed specifically for certain camera systems, such as Canon, Nikon, Sony, or Fujifilm, while others are universal. Ensure that the flash fits your camera’s hot shoe mount and that advanced features like TTL (Through The Lens) metering or wireless communications are supported.
2. Turn Off Your Camera and Flash
Safety first: Always power off your camera and the external flash before attaching it. Turning everything off prevents accidental firing of the flash and avoids potential electrical issues or damage to your gear.
3. Locate the Hot Shoe Mount
The hot shoe mount is located on the top of your camera body. It looks like a flat metal plate with slots, which are used to attach external accessories such as flashes. If your flash uses an alternate connection method (such as wireless triggering or an external sync cable), consult the instructions included with your flash.
4. Attach the Flash
To secure the flash onto the camera’s hot shoe, align the flash mount with the slots on the hot shoe. Gently slide the flash into the mount until it’s snug. Most external flashes include a locking mechanism (typically a tightening wheel or lever) to secure the unit in place. Rotate the locking wheel or engage the lever to prevent the flash from slipping or falling off.
5. Power On and Adjust Settings
Once the flash is securely attached, power on both the camera and the flash. Many high-quality external flashes integrate seamlessly with the camera, enabling TTL metering that automatically adjusts flash output based on your scene and settings.
You can also explore manual mode, where you have full control over the flash's intensity, zoom, and direction to achieve your desired lighting effect.
6. Test the Flash
Before taking your first photo, ensure the flash is firing correctly by performing a test shot. This simple check allows you to verify that the flash is working and properly synced with your camera. If it doesn’t fire, check the flash’s mode, battery status, and connection to the hot shoe.
Pro Tips for Using an External Flash Effectively
1. Bounce the Flash
If you want a softer, more natural light, bouncing the flash is highly recommended. Instead of pointing the flash directly at your subject—which often creates harsh lighting—tilt the flash head to bounce light off ceilings, walls, or reflective surfaces. This technique diffuses the light and creates a more flattering illumination.
2. Use a Diffuser
Diffusers are inexpensive accessories that you can attach over the flash to soften its light output. A diffuser reduces shadows and eliminates glare, providing even lighting for portraits, macro photography, or product shots.
3. Experiment with Flash Angles
External flashes allow you to adjust the direction of the light, typically via a rotating or tilting flash head. Experiment with bouncing the light from different angles to achieve various effects and see how altering light direction can enhance your composition.
4. Balance Flash with Ambient Light
For a natural look, aim to balance your flash output with the ambient lighting in your environment. Reducing the flash power (or selecting TTL mode) can help maintain a harmony between your subject and the surroundings without overpowering the natural light.
5. Consider Off-Camera Flash
If your external flash supports wireless triggering, try taking the flash off-camera. Off-camera flash setups allow you to position the flash anywhere you like, making it ideal for creative lighting techniques like side-lighting, backlighting, or rim lighting. You’ll need a wireless transmitter or dedicated off-camera flash trigger to make this setup work.
6. Adjust Shutter Speed and Flash Sync
When using an external flash, understand the concept of flash sync speed—your camera’s maximum shutter speed that works with flash photography. If you'd like to shoot at faster shutter speeds (particularly for outdoor photography), ensure your flash and camera are capable of high-speed sync (HSS).
7. Utilize Light Modifiers
To level up your external flash usage, invest in light modifiers such as softboxes, umbrellas, or reflective panels. These tools enhance your creative options for sculpting light, whether on-location or in a studio setting.
Troubleshooting Common Issues
Even with proper setup, external flash usage may present occasional challenges. Below are solutions for common problems:
Flash Won’t Fire: Confirm that the flash is securely mounted and that both the camera and flash are powered on. Check sync settings to ensure the camera is triggering the flash correctly.
Overexposed Photos: Reduce the flash’s intensity or use TTL automatic metering to balance the output. A diffuser can also help subdue overly bright lighting.
Connectivity Issues: If your flash is wireless, ensure transmitter and receiver settings are properly configured. For optimal results, maintain line-of-sight between the flash and the camera.
Final Thoughts
Using an external flash opens up a world of possibilities in photography, helping you elevate your work with professional lighting techniques. The process of attaching and using a flash with your camera is straightforward, but the creative applications are practically limitless. Whether you’re capturing portraits, events, or product photography, mastering external flash techniques will dramatically improve your results.
By understanding how to properly mount the flash, adjust its settings, and experiment with various light angles and modifiers, you’ll gain the confidence to integrate external lighting into your workflow. With practice, you’ll learn to harness the full power of external flashes, allowing you to create images that stand out with beautifully lit subjects and dynamic compositions.


")
 - S")


 & Circular Polarizing Filter CPL & Black Mist 1/4 3 in 1 HD Lens Filter with 28 Multi-Coated for Camera Lenses Nano-Xcel Series")
 Nano-Dazzle Series - 24 Layers of Nano-coating, K&F Concept")


