
How To Wear An Action Cam?
2025-09-25 09:31:15
0 Comments
If you love recording your life, you might want to capture your morning run or that epic bike ride through a scenic mountain road. In those moments, strapping an action camera to your chest or helmet lets you film the world exactly as you see it. Watching it back later feels like reliving the whole journey all over again.
It’s the same with skiing, surfing, road trips, motorcycle rides, hiking, climbing, parties, or just casual hangouts—you’ll end up with tons of fun, natural moments on camera. In short, an action camera frees up your hands and helps you capture those times when pulling out your phone just isn’t practical.
But here’s the thing—figuring out how to actually wear and mount an action camera can be tricky for beginners. So let me break it down for you step by step.
When it comes to using an action camera (like a GoPro or Insta360) for sports or documentary-style filming, how you wear or mount it really depends on what you’re trying to capture. In general, there are five main ways to wear an action camera: head-mounted, chest-mounted, handheld/arm-mounted, back/shoulder-mounted, and special mounts. Let me walk you through each of them in detail:
1. Head Mounts
Helmet Mount: Perfect for cycling, skiing, or climbing. Mounting the camera on the front or top of your helmet gives you a natural, eye-level perspective that follows your line of sight.
Head Strap: A lighter option when you’re not wearing a helmet. It’s easy to set up but slightly less stable.
Mouth Mount: Commonly used for surfing or diving. It frees your hands and produces surprisingly stable footage.
2. Chest Mounts
Chest Harness: Great for skiing, biking, or trail running. Compared to a helmet mount, this setup captures more of your arms and body movement, making the footage feel more immersive.
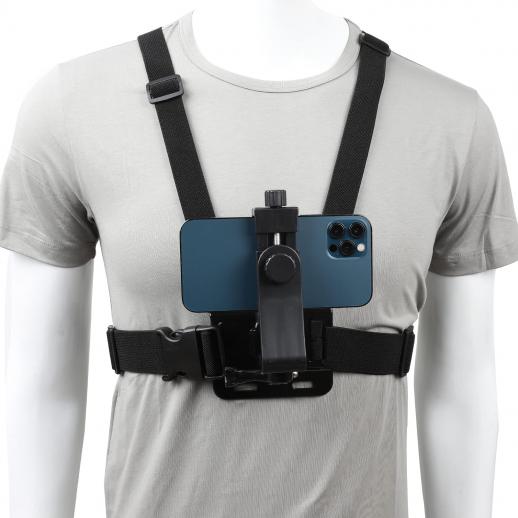
It also keeps the camera at a lower center of gravity, which makes it more comfortable for long sessions.
3. Handheld or Arm Mounts
Selfie Stick / Invisible Pole: Ideal for skiing, travel vlogs, or surfing. Extending the camera away from you creates a dynamic “follow cam” effect.
Wrist Strap / Forearm Mount: Adds a unique perspective by syncing the footage with your hand movements—perfect for climbing, fencing, or other action-heavy sports.
4. Back and Shoulder Mounts
Backpack Strap Clip: Common for hiking or travel documentaries. It’s stable, hands-free, and you’ll hardly notice it’s there.
Back Mount: Great for cycling or group adventures, since it captures teammates or scenery behind you.
5. Special Mounts
Vehicle Mounts: Designed for cars, motorcycles, or mountain bikes, letting you film the ride from multiple angles.
Pocket Clip / Magnetic Mount: Super handy for everyday recording—quick to attach and remove.
360° Swivel Mount: Lets you adjust the angle on the fly during action shots.
Now that we’ve gone over the most common ways to wear an action camera, the next step is figuring out how to actually set it up. The process is pretty straightforward—once you know the key steps, you can make sure your camera stays secure and ready to capture every moment.
Once you’ve chosen the right style, the setup process is simple and follows a few key steps:
Choose the Mount: Pick the attachment that fits your activity, whether it’s biking, skiing, hiking, or everyday recording.
Secure the Camera: Slide the camera into the mount’s slot or quick-release buckle, then tighten the screw to lock it in place.
Adjust the Angle: Tilt the camera to get the right framing—often slightly downward so you don’t just capture the sky.
Add Extra Security: For intense sports or water activities, use a safety tether or anti-drop strap as backup.
Test Before Use: Record a short clip to check stability, perspective, and framing before the real action begins.
In short, wearing an action camera isn’t just about clipping it on—it’s about picking the right mount, locking it securely, adjusting your angle, and double-checking that everything is safe and ready to roll.
After you’ve figured out how to wear and set up your action camera, the next thing many beginners run into is troubleshooting. No matter how good the gear is, little issues can pop up during use.
Here are some of the most common problems and how to deal with them:
Loose or shaky footage – Often caused by mounts not being tightened enough. Always double-check screws and straps, and use stabilization features if available.
Fogging inside the lens or housing – Common in humid or cold environments. Use anti-fog inserts or let the camera acclimate before sealing it up.
Battery draining too fast – Action cameras work hard. Lower the resolution/frame rate if you don’t need 4K, turn off Wi-Fi when not in use, and carry spare batteries.
Overheating – Can happen when recording long clips in high resolution. Record in shorter bursts and avoid leaving the camera in direct sunlight.
Unstable angle or misaligned view – Sometimes the camera slowly tilts. Check the angle before every session and tighten all joints properly.
Water leakage – If you’re using it underwater, always check the seals on the waterproof housing and keep them clean.
Memory card errors – Use high-speed, reliable cards (UHS-I/UHS-II). Format them in the camera instead of on a computer for best performance.
Pro Tips from Photographer's Experience:
Test Before You Start: Always record a few minutes before the actual activity to check framing, stability, and perspective.
Safety First: Make sure straps are tight and use a tether in case the mount comes loose—especially for water or aerial sports.
Think About the Viewer’s Perspective: Head mounts feel more immersive, chest mounts are more stable, selfie sticks are more dynamic, and back mounts are great for showing the environment.
Keep It Light: For long sessions, comfort matters more than the perfect angle. A lighter setup will let you enjoy the activity without distraction.
Conclusion
Wearing an action camera effectively can take your adventure video to professional levels. The key is finding a mounting style that balances comfort, stability, and perspective while complementing your specific activity. Whether you opt for a head strap, a chest harness, or a clip-on mount, taking the time to perfect your setup is well worth the effort.
Now, grab your action camera, select your mount, and step into the exciting world of high-quality adventure filmmaking. Your next breathtaking footage awaits!
Leave your comment
Note: HTML is not translated!


 Filter Nano-Xcel Series - HD Fixed & Ultra Slim Frame Import Optical Glass Neutral Density Filter")


")
 HD Hydrophobic VND Filter for Camera Lens No X Cross Nano-Xcel")


